
WHAT IS A TILE LEVELING SYSTEM?
While the process of installing tile is a complicated one, the desired result is pretty simple: flat tile. The inherent nature of the tile itself present challenges in accomplishing this, as does the substrate you are installing over. Usable on both walls and floors, this is where leveling systems come into play.
There are different kinds of systems out there, but they have the same basic components: a spacer that locks in below/between adjacent tiles and a component that pushes down from the top. Basically it creates a system that pulls the tile from below AND pushes it from above, limiting lippage from one tile to another. While these systems can help reduce lippage, it is still important that you are installing on a flat substrate.
DIFFERENT TYPES OF SYSTEMS
As we mentioned above, there are a couple of different types of leveling systems, which all aim to give you the same end result. The concept behind each is the same, the process of using them is just a bit different. Louisville Tile carries both the wedge (Raimondi) and screw systems (B.O.E.).
Traditional Wedge System
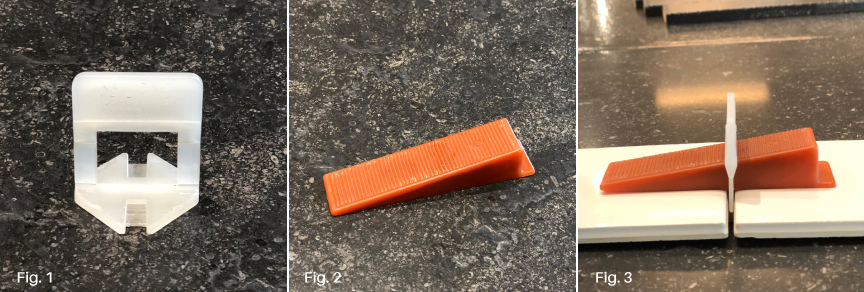
The traditional clip and wedge system consists of 2 parts… the clip (fig.1) and (you guessed it) the wedge. (fig. 2) The clips come in different widths depending on your grout joint, and are placed under and between 2 adjacent tiles. The wedge is then pushed into the clips, putting pressure on the tile and helping to reduce lippage (fig. 3). The wedge system is made even easier with the Raimondi pliers, which speed up the process of inserting the wedges. The wedges are reusable, and are universal across the various clip sizes.
cap System
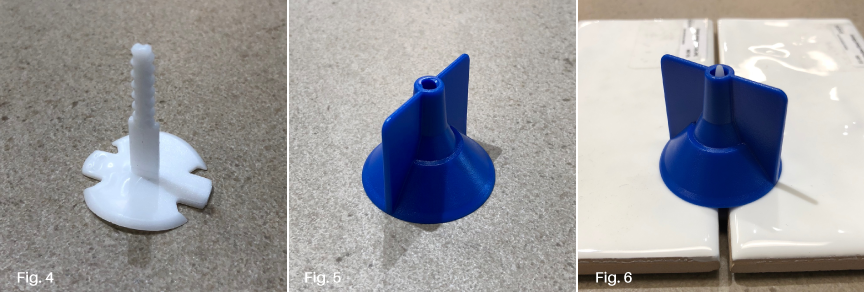
The cap system consists of 2 parts, much like the wedge system. You have the clip (fig. 4) and the cap (fig. 5). Just like the wedge system, the clips (which is threaded) come in different widths depending on your grout joint and go under and between 2 adjacent tiles. The cap is then finger twisted on and tightened down to reduce lippage (fig. 6). The caps are reusable, and are universal across the various clip sizes.
REMOVING THE CLIPS
Regardless of which system you choose, removing the clips is the same. Once the thinset is dry, simply go through and hit the side of the clips and they should break off below the tile edge. You can use a mallet, hammer, or even your foot. Then all you have to do is sweep up the wedges/caps (which are reusable) and you are ready to grout.
For larger jobs, the Clip Dozer is a great way to speed up the clip removal process. Just run the Dozer along the grout lines, and it will leave you with a perfectly hidden break every time without the need to bend over. See a demonstration below.
CHOOSING THE RIGHT SYSTEM
While there are slight advantages between systems, it really comes down to personal preference. The wedge system, generally speaking, is slightly cheaper to get started with and easier to use. Even though the cap systems can be a little more expensive, it also requires fewer pieces per job (because 1 piece placed in the corner can reach all 4 tiles). The wedge system is also a faster install compared to the caps, especially if you plan to reuse the caps (since they have to be “unscrewed”) So, while there are small benefits to using each system, it really does come down to personal preference. Give both systems a shot, and see which better fits your needs.
Disclaimer
These systems are engineered to aid in the installation of ceramic tile, and are not a replacement for high quality workmanship and recognized installation procedures. With any tile application, all industry standards (for tile installation and surface preparation) must be followed. Utilizing these systems, in combination with industry standards, will help insure a high quality / aesthetically pleasing application.
